Enabling ColdFusion WebSockets with IIS enhances your web applications by facilitating real-time, bidirectional communication between clients and servers. This capability is essential for applications like chat systems, live notifications, and dynamic data feeds. When integrating ColdFusion WebSockets with Internet Information Services (IIS), proper configuration is crucial to ensure seamless functionality. Below is a comprehensive guide to setting up and troubleshooting ColdFusion WebSockets with IIS.
Prerequisites:
- ColdFusion must be installed on your server.
- The target website should be configured within IIS.
Configuration
Step 1: Enable WebSocket Protocol in IIS
First, ensure that the WebSocket Protocol feature is installed in IIS. Note that for all ColdFusion sites on xByte Cloud, the “WebSocket Protocol for IIS” is enabled by default.
- Open the Server Manager.
- Navigate to Manage > Add Roles and Features.
- Proceed to the Features section and ensure that WebSocket Protocol is checked.
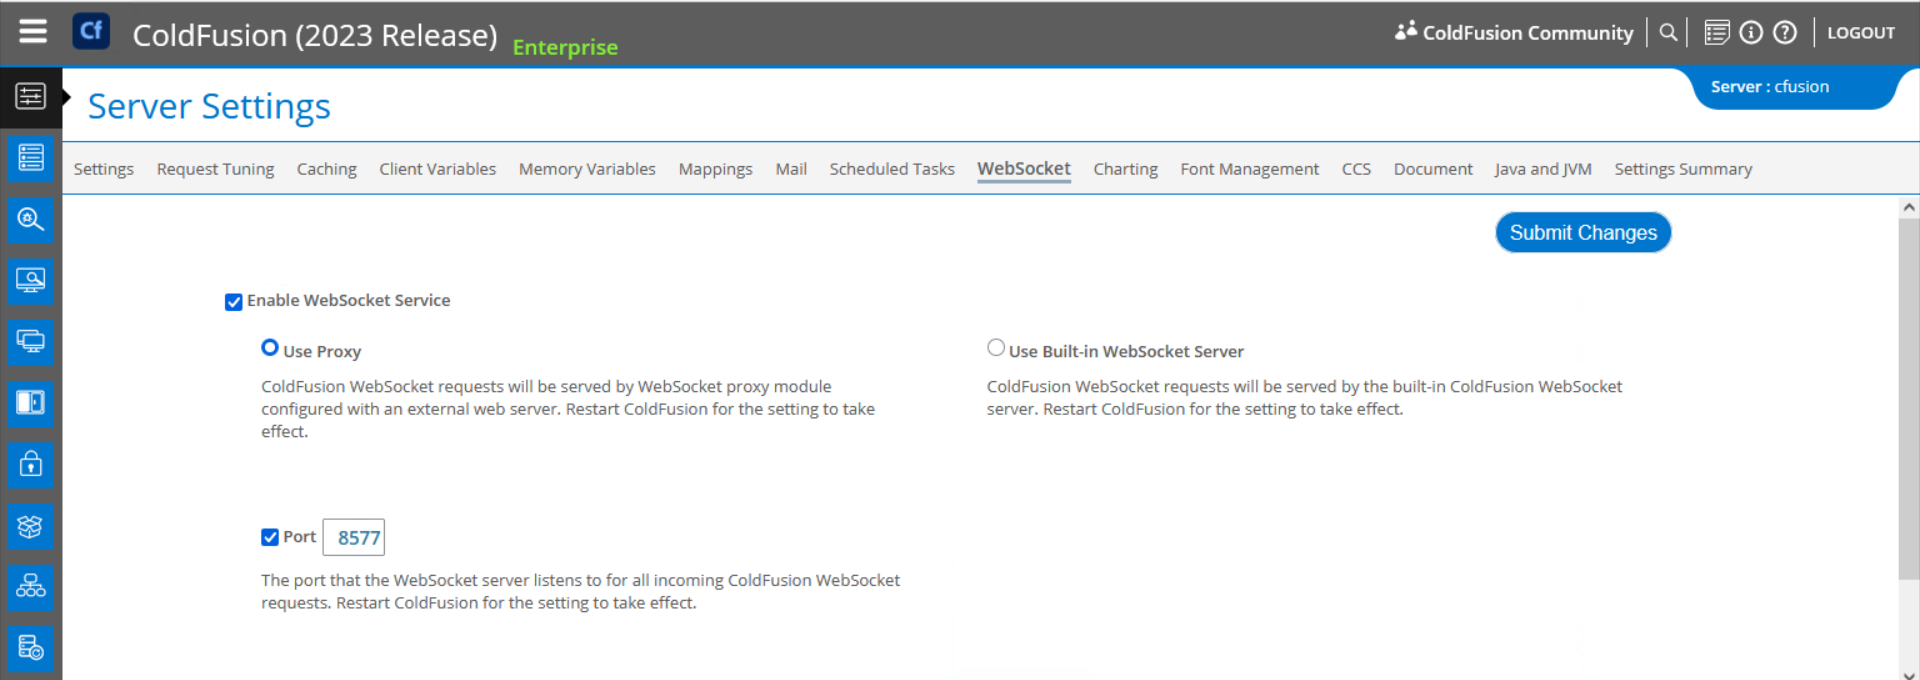
Step 2: Enable WebSocket Service in ColdFusion
- Log in to the ColdFusion Administrator (CFAdmin).
- Navigate to Server Settings > WebSocket.
- Ensure that the Enable WebSocket Service option is checked.
- Select Use Proxy, and note the proxy port (e.g., 8577).
Step 3: Configure the WebSocket Proxy in IIS
- Navigate to the ColdFusion bin directory (e.g., C:\ColdFusion2023\cfusion\bin\).
- Run the wsproxyconfig.exe tool as an administrator.
- In the tool, click Add.
- Configure the following settings:
- WebSocket Proxy Connection Port: Set this to the same port noted in Step 2.
- IIS Web Site:
- Choose either:
- All: Configures all sites in IIS to use WebSockets over the proxy.
- Specific Site: Select a particular site that requires WebSocket support.
- Click OK to save your selections.
- Repeat the process for additional sites if necessary.
Step 4: Restart IIS (if necessary)
Some changes may not take effect immediately. To ensure proper functionality, restart IIS using the following command in an Administrator Command Prompt:
iisresetTesting WebSockets
We recommend using Adobe’s sample WebSocket code to verify WebSocket functionality.
- Create an Application.cfc file and define a “stocks” channel.
- Create an index.cfm file that subscribes to the “stocks” channel.
- Open the test page in a browser.
If configured correctly, you should see output like the example below. If you encounter issues, consider the troubleshooting steps below or contact our team of experts.

Troubleshooting Common Issues
- Verify IIS WebSocket Module Installation:
- Ensure that the WebSocket Protocol feature is installed in IIS, as outlined in Step 1.
- Run wsproxyconfig.exe as Administrator:
- It’s crucial to run the wsproxyconfig.exe tool with administrative privileges to ensure it can make the necessary changes to IIS.
- Confirming wsproxyconfig was successful
- Check your site(s) in IIS and verify that the “cfws” application was created underneath your site(s)
- After utilizing the wsproxyconfig tool, verify that the configuration is correct in the following files.
- C:\ColdFusion2023\config\wsproxy\1\bin\config.ini: Verify that the “Port=” attribute matches what is defined in CFAdmin
- C:\ColdFusion2023\config\wsproxy\wsproxy.properties: Verify that the connector references your site(s) and that the port is the same as what is defined in CFAdmin and the config.ini file.
- Enable Detailed Error Messages:
- Detailed error messages can provide more insight into issues when troubleshooting.
- In IIS Manager:
- Select your site and double-click on Error Pages.
- Click on Edit Feature Settings and choose Detailed Errors.
- In ColdFusion Administrator:
- Navigate to Debugging & Logging > Debug Output Settings.
- Check Enable Robust Exception Information.
- This setup will provide more descriptive error messages, aiding in troubleshooting.
Additional Resources
For more detailed information and advanced configurations, consider the following resources:
- Adobe ColdFusion WebSocket Enhancements
- This resource provides comprehensive information on configuring WebSocket proxies, SSL support, and cluster configurations in ColdFusion.
- Manually Configuring the IIS Connector
- Offers detailed steps to manually set up the connection between ColdFusion and IIS, which can be beneficial if the automatic configuration encounters issues.
- Mastering WebSockets with ColdFusion: Code Faster, Code Smarter by Giancarlo Gomez
- Video demonstrating topics covered in his ColdFusion Summit presentation. And includes even more helpful links.